maven (noun) -someone who is dazzlingly skilled in any field; an expert or connoisseur; experienced.

fresh (adj) -original, vivid, cool, fashionable, sparkling, green; not previously known; new or different; not altered by processing.

Rebecca + Sesheta = MavenFresh

Showing posts with label PFMs Do It Better. Show all posts

Friday, June 22, 2012

PFMs Do It Better: How to Create a Gallery Wall

We've been in our house for over a year, and between work and the holidays and life in general I feel we're finally settling into our sweet little abode. In the past I've shared my exterior paint job, how-to make your flat screen tv more attractive, and my lust for some seaside art, but the main floor has overall been a work-in-progress. I fell in love with the 1920's bungalow style of our beach house and its arched doorways, vaulted ceilings, and wraparound front porch. I had tons of inspiration around me to make this place our own. We decided to it was about time to liven up our blank living room wall and give it a personal touch...can we say gallery wall?

You need: 
a hammer
painter's tape
tissue paper (or newspaper)
tape measure, (level; optional)
picture hanging hooks, nails, screws, etc

 First- collect, collect, collect. Think about framing a favorite postcard, fabric swatch, or a record album to create an impact. I saved a wallpaper remnant that sadly never made it onto an accent wall...but it did make it into our gallery arrangement! A couple of works by our artist friends make this collection even more special to us.

mirror | bracket | sconce | bust | giant buttons | shelves | plate

Go beyond the frame. Add some depth, texture, and dimension!
That rhino bust...yep, I went there.


Play around with placement. To do this, lay the tissue paper on top of your pieces and cut carefully. Use painter's tape to try them on the wall in different arrangements...you won't end up with a wall full of holes before committing. A general guideline (not a must) is to hang pictures at 57" on center from the floor. This is "gallery height" and roughly the average human eye level. We loosely used the 57" line to dictate the center of this gallery-style grouping (meaning, the row with the Ferris Wheel is at this line so we can still hang more pieces below/above and it will work out oh-so-well.)


HOH Design
Following are images of a project  I recently completed and was just featured in the the new issue of TRADhome. It was such a fun project made that much easier by the fact that the clients trusted my vision, had an incredible collection of art to work with and a real sense of humor and adventure that comes across in the interior (I hope). 
image via bitohoney


image via bitohoney
There is right or wrong way to do it. Uniqueness is built on imperfection! Still... creating a stylish arrangement can be intimidating, so here are some suggestions: 
~find an inspiring arrangement via the net or a magazine and make it work for you
 ~keep a few inches between all pieces for consistency
 ~make sure you hang dimensional pieces higher if you are curating a wall near heavy foot traffic
~when in doubt, just hang your most loved piece in the center of the wall and work your way out 
~vary the frame style for a diverse eclectic vibe
~unify the frame style for an updated contemporary vibe
~consider transforming an inexpensive frame with paint or tape

Leave room for the unexpected. I love the concept of an ever-changing and growing gallery wall. I've started small, but will be adding new pieces as I get them, eventually stretching this into a salon-style installation from chair rail up to ceiling!

(Clockwise from top left to right: Mirror-West Elm, Painting- gift from Anthony Santamaria, Savannah Story Bust- Anthropologie, Typography Art Print- Ashley G, Coney Island Ferris Wheel Print- Minagraphy, Print- gift from Ann Farrell, Salton Sea Print- Leah Giberson, Wallpaper Swatch- Anthropologie)

Have a great weekend and don't forget to enter our giveaway, it ends on Monday night!

Thursday, May 24, 2012

PFMs Do It Better: Fighting Frizz!


Do you fear frizz and bad hair days? Are you tired of the rainy humid weather that we've been having for the past two weeks? Ladies (and gents) you are not alone...I give you two solutions for fighting frizz: my savior and my go-to.
 
Lately I've been getting well acquainted with Oribe Impermeable Anti-Humidity Spray. I discovered this stuff during my trip to the Whittemore House Salon. The stylists are big fans of this line over there, and now I'm addicted too! This spray is perfect for keeping my fringe under control- a major plus for us gals with bangs. So far I've put a few different hairstyles to the test (loose natural waves, messy side bun, and a deep side sweep with flat iron) that ended up staying relatively frizz-free and not at all greasy. Yay! I highly recommend it although a bit pricey. You won't really be using this every day,  just as your savior from heat and humidity...boy do I see a bunch of those days in our near future.

When in doubt this spring and summer, grab a silk scarf and tie it around your head into a bow or wrap it turban-style. A bright color and pretty print will step up your outfit and let you embrace any unsightly frizz. Simple as that. My go-to collection of vintage silk scarves keeps growing every year. But I don't have a polka dot version just yet...!!!

So what do you use for frizz protection?

Friday, May 11, 2012

PFMs Do It Better: MF on Instagram!!


The PFMs have now added another fun way to follow us!  Check us out on Instagram to see life thru our lens! Like us, follow us! How exciting!!!


Tuesday, May 1, 2012

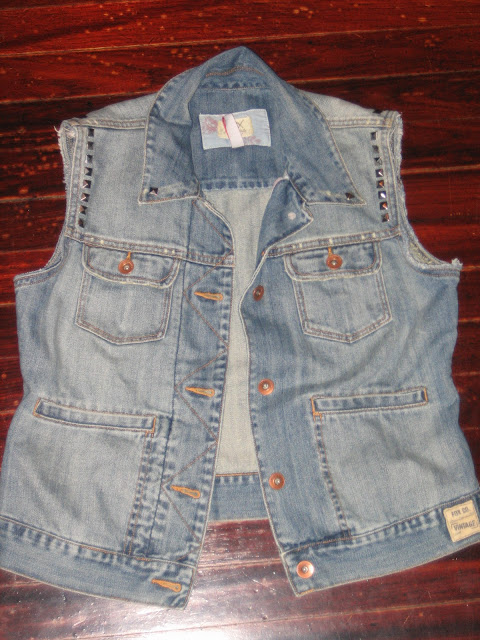
PFMs Do it Better: DIY Studded Denim Vest

soo... i know the denim vest has been done... many, many, many times before.  you may even have seen a DIY on how to make a denim vest.  either way, i thought it would be fun to show, yet again, how this classic staple can be done at a really low cost to your pocket.  sure you could buy one already made, but where's the fun in that??  this is an easy project that only requires a little bit of time and a bit more creativity.


the first step is to gather your materials.  i hit my local thrift stores to find this denim jacket. i had to consider size, color and styling of the jacket.  i turned down a few because they just didn't fit or look right.  next,  i got some studs, i chose silver, which you can just about purchase in any craft store or order online.  then i got my trusty scissors.  it's really important to keep special scissors for cutting fabric.  it truly makes cutting straight as well as smoothly easier.


the next step is super easy - just cut off the sleeves.  if you have nice sharp scissors, this can be done in five minutes.  you can also choose how close to the seam you go for a more frayed look.  before i moved to the next step, i washed the vest as is - so that it would be fresh and clean for me to wear and also to help start the fraying at the edges.


now comes the final step- studding!! i totally forgot that i had one more tool; i also used my long needle nose pliers to assist me with making sure the studs closed nice and tight.  most people have these in your average tool kit.  (be sure they are clean so as not to mark your clothing.)  though this part can be tedious, especially depending on how much studding you plan on doing, it can be fun to design how to attach your studs.  i suggest thinking it out a bit first before committing.  it can be challenging to remove studs once securely attached - i learned that the hard way lol. 


...and done!!!  as you can see, i chose a simple studding pattern.  i like the subtlety of just a touch of studs.  besides, since we know these vests only get better with time, i can always add more studs later!  i can't wait to wear this with my summer maxi dresses and skirts or with my Docs and skinnies!! yay!!  :)

Wednesday, April 18, 2012

PFMs Do It Better: Dotted Mani How To


I've been inspired to try out a dotted manicure for a while now, and I'm loving the results! With this latest creation I got a bunch of compliments... on my nail polish strips (ha, my fault since I'm always wearing the Sally Hansens.) Suprise, surprise...it's nail polish! It's a tiny bit more work than I usually put into my manicures, but it was super easy and totally chic. Can't wait to try out more ideas in the future. 

Pick your color. Pale lilac is the color of the moment...just ask Lucky Magazine. I agree, but really I picked Zoya Nail Polish in Megan out of my collection knowing that it would be a subtle milky background for the white dots. Other recommendations? A cool mint or soft peach.

1. Prep your nails. Do your thang...file, shape, buff etc.

2. Apply base coat. Sally Hansen Salon Manicure base is my fave.

3. Apply two coats of your nail polish. Let dry completely.

4. Using a nail art pen, make your dots. It's that simple. This pen has a precise point that's easy to use. Hold your hand steady and start dotting! I began closest to the cuticle and worked back and forth with my dots until the tip of the nail. Let this dry completely.

5. Seal with a topcoat. I swear by Essie Good to Go, and I've tried plenty! My mani is still going strong after 4 days...only one nail is chipped (due to a fight with my desk drawer; I lost.)

Enjoy!!!

Monday, March 26, 2012

PFMs Do It Better: Spring Fever for the Exterior!

Do you have it yet...that feeling of Spring Fever? Well if you have it and it's making you want to tackle some outdoor home projects that have been put off for months, I'm saying it's now the prime season for house painting. Choosing paint color can be intimidating; it may take you weeks to decide on the look that you want for your exterior redo. So let's start planning now!

We purchased our house a little over a year ago. It was originally built in 1920 as a small raised bungalow. This is what the house looked like after priming it for the new paint job.
Primed and ready for fresh paint!
I thought if nothing else, I wanted to paint over the black trim and the dark red door, but after a few months of living there I wanted to do much more than just that. The stucco was painted white, once, a loooooong time ago, and visibly repaired in a few places. It was in desperate need of a fresh coat of paint as you can see. 
Painting prep: repair stucco cracks

*It helps if you have a focus, or at least one color that you love and must have. Personalize the look, make it your own. In my case, it was the door. I just knew we had to have a bright yellow door. Narrowing it down to the specific shade of yellow came later!

*Think about the neighborhood. One option is to coordinate with your neighbors a bit since they are part of your curb appeal. Also, think about location. If you're near water, maybe you are inspired to create a palette based on cool blues of the sea or the beige colors of the sand. Maybe you're in a wooded area with lots of green and landscaping...then you would want to pick contrasting colors so that your house doesn't blend in too much and get lost in your surroundings. Living in a beachside community with close proximity to our neighbors, we decided to embrace the sand with our main color and contrast with crisp white trim that screams beach! We saved the bright colors for accents like the door, furniture, and (coming soon) accessories. Doing this made our house look bigger (yay!) and not stick out among the other neutrals on the block.

 
*Consider any special characteristics that you want to highlight...like ornate trim, or the ceiling of your porch. We brought in the surf with a light blue porch ceiling color. It's so relaxing sitting under there. Maybe you want to play up the colors of your roof? After taking a good look in daylight I realized our slate roof tiles weren't just blue-grey; they have lots of rich beige-brown in them. This totally helped with the paint decision. The main sand-beige paint color I chose for the stucco really brings out the color variations in our roof tiles. We've been getting plenty of compliments from people walking by who say they didn't realize we had a slate roof until the house was re-painted!  

*When it came time to make color decisions we just painted samples directly on the house since it was white(ish). But painting samples on white foam core board will really help you decide where to put the color, and what colors to choose. Have fun with it!

 *Relax...there's lots of other details that you can update easily if you're not ready to tackle a paint job: replace your house numbers/mailbox/doorknocker/hardware. These minor changes will create an overall makeover without breaking your budget or costing you lots of time.
 

We used Sherwin Williams Duration Exterior Paint (HIGHLY RECOMMEND) which was colormatched to these Benjamin Moore colors: Body- Alexandria Beige HC-77, Door- Bright Yellow 2022-30, Ceiling- Jamestown Blue HC-148, Floor- Tamarind AF-120, Trim-Frostine AF-5.
 
I loved every second of the planning, shopping, and paint swatching. I'm all smiles each time I come home and see our bright yellow front door. Trust me, this type of a makeover will have you feeling unbelievably fresh and happy...after all, the exterior of your house is something that you look at every day. My next project for Spring will be the porch. On my to-do list: redo the landscaping below, add planters on the railing filled with fresh flowers, buy bright new pillows on the sofa to pull the paint colors together, paint a rug on the floor, and accent with some candles or mirrored mobiles.

What's going to be your Spring Fever project? Let us know if we can help you with anything.

PS- I have a fantastic painter you can contact...!

Sunday, March 11, 2012

PFMs Do It Better: DIY Wall Art/How to Hide Your TV Wires


I was very hesitant to have a wall-mounted TV, but it really is a space saver. The down side? Those pesky TV wires. We put the TV up about 10 months ago, and I've been staring at wires ever since. Not any more! My super-talented father-in-law loves a good DIY, and luckily he was ready to help my husband and I attack this one. I already had the fabric (purchased from IKEA), because originally I planned on making curtains or pillows with it.  Enter Fred with his frame-as-coverup idea. After much discussion and anticipation about we picked a DIY date and put this plan into action. Of course you will modify accordingly, but I think this would work so well for anyone trying hide wires. We conveniently have a recessed wall area over the fireplace, but if you don't and want a more finished look you could always "frame the frame" with strips of molding. 


Measure and layout before purchasing your materials. It might help to draw up a sketch. Materials we used: Five 2"x1"x8' wood strips/The DIY Kreg Jig/ pack of 1 1/4" pocket screws/Hand saw/Fabric for your panel/Cotton batting/Staple gun/Power drill/Saw horses/Tape measure/Clamp/Xacto Knife/ Scissors/4 L-Clips


Drill pocket holes in order to create a frame. Using the Kreg Jig we were able to make two pocket holes per joint and connect the two pieces of wood at a 90 degree angle. The Kreg website has a video that helps to explain this. It made this project much easier to complete, we had the correct angle every time!


Clamp the corner joint together before drilling the screws into the pocket holes.


 Check to make sure that the frame is the correct size.


We laid out the sub frame to fit around the TV mount.


Use a hand saw to cut the wood...but you can also use a chop saw.


I'm drilling the screws through the pocket holes to fasten the two joints. I love a good power drill, it takes me back to my days as a display coordinator at Anthro. This was easy peasy!


Frame is done! We placed it on our dining room table to have a work space. Lay out the fabric on top of the frame and adjust till it looks visually pleasing within the fame. Start stapling in one corner just to tack the fabric down a bit.


Flip over the fame with the fabric to continue pulling and stapling. We used a little extra padding in areas (cotton batting) to reduce the gap between the frame and the wall. Our existing wall was a little out of square. This pic also gives you a perfect shot of the completed sub-frame!


This is when having some extra assistance comes in handy (thanks Mom-in-law!) We had to pull and hold the fabric taught starting along one side while stapling the fabric consistently along the backside of the frame. Repeat along all sides while making sure to keep the fabric pulled tight.


Now the crucial part...were you wondering how to keep the fabric taught even with a large hole being cut out of the middle? Staple the fabric to the sub-frame prior to cutting the hole to ensure that the fabric will not loosen up. See the rectangular outline of staples in the pic!


 Using an exacto knife, cut an X from corner to corner of sub-frame, within the staple outline. Staple the flaps to the back of the frame and cut off any excess material. I was almost sad to cut the hole because the panel looked so pretty...hint, hint if you don't have TV wires to hide: without the hole this could simply be a pretty piece of wall art!


 My man putting the finished piece up...we used 4 L-clips to fasten the frame to the wall.


TA-DA!!! Wires are completely hidden, and we have beautiful wall art instead. This was a simple DIY, especially with the support of my father-in-law and his Kreg Jig (I love that thing.) The finished product is something that we can easily take down and put up again in a few years to replace the fabric if we want a fresh new look. Currently it's perfect for our color scheme of blue and grey with pops of yellow. We couldn't be happier with the outcome, it adds character to the living room. I think a few decorative objects on the mantel are long overdue! 

Tuesday, February 14, 2012

PFMs Do It Better: DIY Eugenia Kim Inspired Crochet Cuffed Pom Hat

You're either romantic or you're not...and I'm not so much. So instead of getting all hearts 'n flowers on you, I'm going to share a simple DIY that's completely unrelated to Valentine's Day. But the end result will keep you looking cute, cozy, and chic. I love Eugenia Kim's line of  headwear, the pieces are fabulous. Inspired by this ultra-expensive cuffed Rain Hat that I could not afford, it was time to come up with a crochet pattern alternative.

Materials: 2 Skeins Super Bulky Yarn in Black- I like to use Wool-Ease Thick & Quick or Loops & Threads Cozy Wool
N hook
Large Eye Blunt Needle
4” square of cardboard
16” long strand of yarn (not pictured)
Scissors!

Begin: Chain 24.
Row 1: Single Crochet in 2nd chain from hook and in each chain across. (23 sc)
Row 2: Chain 1, turn, and sc in back loops only all the way across.
Repeat Row 2 until piece measures approx 19” from the beginning.

Finishing Up: Now rotate the piece so that you can seam ends together; sl st in each st across to make hat. Fasten off and leave a long tail. Thread tail through ends of rows along edge and pull to gather for top of hat. Make a secure knot.

Pom-Pom: There are many ways to make a pom, but this is how we do. Using the 4” cardboard square, wrap the yarn around approx 60 times.  Carefully slide the yarn off the cardboard, and using your 16” piece of yarn, tie it around the center of the yarn bundle. Pull tight and knot securely. Cut the loopy edges to make them open up into pom-pom strands. Attach pom-pom to top of hat. Weave in ends.

Done, now you can wear this hat all winter! It looks pretty close to the original and you saved yourself over $100. Cuff it up and strut your stuff. Can't crochet? No worries, you can still get the look for less with the Greenwich Beanie Hat, now available in our etsy shop.

Tonight I will be enjoying the best brick-oven pizza on Long Island with my favorite guy at our new favorite spot. Intrigued? Maybe I will be tempted to share with y'all at some point, but for now we have to keep this little gem under wraps! Any special plans with loved ones for Valentine's Day? Do you like to celebrate it, or will you be curling up on the sofa and cranking out this DIY? 

Friday, February 3, 2012

PFMs Do It Better: How To Re-Sell On eBay

I'm only sorta kidding when you hear me say I'll wear a piece once, then sell it on eBay. In fact, my husband and I have a running joke with the punchline being "Put it on eBay." In my closet there are definitely some vintage pieces (and classic Anthro) that I will never part with, but otherwise I assess my wardrobe seasonally and sell the things that are no longer on rotation. As a general rule of thumb, if the piece hasn't been worn by me in 2 years, it's gotta go. And if it's never been worn (yes this happens) it definitely has to go! It will move on to someone who can give it the love that I could not. This all started as a way to make some extra cash while downsizing my closet in 2001; then it was a brief full time gig in 2008 when I helped a business associate empty a warehouse full of designer labels...ahh good times. Currently, this sweet process of wardrobe recycling finances my shopping habit... I sell a few pieces and then use those funds to buy a few pieces...you get the idea. 

 I don't consider myself a total expert on eBay but there's gotta be some reason that I constantly get questions about how to sell. My listings have varied over the years from a vintage fur coat to a used fridge. Ha- seriously. But the majority of my eBay listings are previously loved clothing, shoes, or accessories that we refer to as Maven ReFreshed. Without further ado here's my basic roundup on how to sell...or should I say re-sell.

1. I often buy with the intent to eventually sell. This just means I take really good care of my purchases. For higher priced designer pieces, remove the tags and save them. Not because you are going to pass them off as "new with tags", but because you can use them to reference style, retail price, etc. And it's always nice to give your buyer the original extra buttons that came with that Cartonnier blazer. Read care labels and follow them. To make denim last longer: wash jeans inside out, only putting them in the dryer for a brief period on low, then let them air dry. 

2. Be "seasonal" when selecting pieces to list. If you want to make back as much money as possible, don't list your hooded wool duffle coat in July. Store it where you will remember to list it when the timing is right. 

3. Prepare your items to sell! This may mean weeding some pieces out to donate rather than sell. Examine your items with a SUPER critical eye. Note any and all defects, marks, stains, etc. No one wants to be bothered with a disgruntled buyer. Selling on eBay is all about having a good reputation with positive feedback; buyers will keep coming back if they are pleased with their purchase.

4. Before setting your price, compare compare compare! Do your research and see what similar items are selling for. Look up the designer, and narrow down by style name (if you have it), color, and size. I like to price competitively, so if my item is in better condition, I start the bidding a bit higher! And if you aren't very attached to a piece, list it as such: to this day I can be still be surprised that the old jeans I listed for $9.99 ended up going for $40. Oh the thrill of the bid!

5. Use the title space wisely. Please don't put "Gap Pink Cardigan." How is anyone going to find your listing? Use as many descriptive words as possible...the neckline, the closure, the sleeve length, the texture, the shade of color...these are all details that can be relevant. Again if you saved the tags, you may have a style name in your hands that will increase your item's value!

6. Pictures... must be clear, with a simple background, documenting multiple views (the designer label, front, back, closeup of a flaw, etc). I've learned that pants photographed flat either on the bed or on the (clean) floor sell best. The pics don't need to be fancy to get bidders, but they must be legit.

7. Put yourself in the buyer's position and ask what you'd want to find out from the description. Item condition is important. Have you worn this item too many times to remember, or just once? Where was this originally purchased from? What was the original retail price (only include this if you know for sure). Take measurements and disclose! This will save you the time of answering 20 emails asking same sizing question. And if you do get questions, answer them promptly.

8. Here's a FAQ...does the buyer pay for shipping? 99% of the time- YES! Unless you are offering free shipping, which I usually reserve for a highly coveted item. Don't let shipping be the reason why you are afraid to sell on eBay. Make sure the buyer has paid you in full for the item before sending it. I only accept Paypal as payment and I use USPS Priority Mail. The packaging is free, you can print out your shipping label and schedule a pickup online, all of which means no trips to the post office for you. Yay!

9. Send your items off with a swift once-over of the lint brush, and safety pin your tags on for safe keeping (if you have them.) I like to fold sweetly and wrap in tissue or plastic with a little thank you note. Tip: if you plan on leaving your item in the mailbox for pickup and it's raining/snowing, make sure the item is covered appropriately. No one wants to receive their highly anticipated win only to realize it's wet 'n soggy with a color bleed stain from blue tissue paper!

10. Is online selling not your thing? If you aren't the type of person with patience or time on your hands to devote to the eBay process, and you would rather us PFMs sell your items  for you, let's discuss via email! Or, you can take your goodies to a resale boutique. You most likely won't make as much money back but you can get quick cash in hand or store credit; not bad for lower price point items. There's a couple of places I can recommend for you Long Island ladies- Look Twice Consignment or Salvage Chic Boutique. Call ahead to ask what items they are currently accepting.

That's 10 fundamentals of selling...enjoy, and if you're like me, have fun buying on eBay too! We'd love to hear any tips you might have for consigning/re-selling/swapping.

Friday, January 27, 2012

PFMs Do It Better: Seductive Brown Eyes

Seductive Brown
the inspiration

the tools

5. the blush!  how could i forget!! 
                                                       

my version
seductively brown eyes

my new fave lip color

i am a novice make-up artist.  i've been doing my own make-up since the days i used to perform in musicals as a little girl.  at age 9, i had no idea how valuable these skills would be for me now.  i love looking at a make-up look and trying to recreate it and now i'm sharing my experimentation with you!

step 1. the inspiration "Seductively Brown" (pic.1)-  while perusing the Make Up For Ever site, i came upon this look which was super sexy and seemed easy to replicate.  

step 2. the tools (pic. 2) - i gathered my tools of the trade to begin playing.  though i don't have the palette that was on their site, i used what i had in my collection to help me achieve the look. 
  1.  after applying concealer and foundation to my face, i primed my eyes using the Urban Decay primer that came along with my NAKED eyeshadow collection (did we mention that there is a NAKED 2 collection??!! but i digress...).  then, i applied DARKHORSE to my eye lids.    i used BUCK in the creases.  i also used VIRGIN just under my eye brow and then used NAKED between VIRGIN and BUCK to assist with blending.  the Make Up For Ever steps suggested blending color under the eye also, but, since i was wearing this look for day, i left this step out.  
  2. i used a dark brown eyeliner, like this MAC eyeliner in coffee, to line my bottom lashes.  I then smudged the color to get that smoky look.
  3. i applied my tried and true Maybelline Great Lash mascara in Brownish Black on both my upper and lower lashes.
  4. then i added Make Up For Ever Rouge Artist Intense lip color #39, described as a orange coral, on my lips.  LOVE this nude color!! so chic with just about any look!
  5. i forgot to add this staple to my tools pic!! i use this Lorac bronzer/blush duo almost every day!! it is the perfect light color to compliment the dark eyes and nude lip.
step 3. choose an outfit to compliment your face- this was the first time i decided my make-up look before i knew what i wanted to wear!  goes to show, inspiration is inspiration - no matter the form.  i thought my (borrowed) fedora and edgy chain earrings worked well to compliment my smoky eye!

Ta-da! seductive brown!!  can't wait to try this on a night out on the town!

(Men's Fedora - unknown, Jade Cluster earrings - MavenFresh)

Friday, January 20, 2012

PFMs Do It Better: Getting Carrie Bradshaw Waves


It's no secret to anyone that knows me...I love Carrie Bradshaw and her signature hairstyles. One of my faves that's so easy to recreate is her big messy waves (hair-did here and here.) Best part? Whether your hair is fine, thick, frizzy, or pin straight- you don't have to master a curling iron to own this style!   

1. After showering I prep with two pumps of Pantene Split End Repair in my palms, and work it into my damp hair starting at the ends. It works wonders. I stop halfway up...and there's no need to comb it through. 

2. Then I spray Bumble & Bumble Styling Lotion with abandon, concentrating at roots. Blow dry with a diffuser, while lightly scrunching. This styling spray gives you soft volume and adds to the textured-piecey-disheveled look that we are going for. Try to keep ends free of product for more movement.

3. Once hair is dry, the real action begins. I was a loyal curling iron fan until my hairstylist turned me on to the Hot Tools Deep Waver and now it's become an addiction. This is one purchase that you will never regret! My hair is thick so I like to adjust the heat setting under 400 degrees and section my hair half-up before making waves.  Just clip the top layer of your hair up in a loose bun and start underneath. We are going for deep beautiful waves...grab (approx) 2 inch section of hair and start several inches down from your roots with the first clamp. Repeat. Repeat again, if you're hair is at all on the longer side like me. Three clamps per section is my motto. Keep going till your entire head is full of waves! If you have bangs- play with what you like best. Most times I just blow dry them straight, but if I'm in between bang trims I've been known to clamp 'em!

4. I love CHI especially in the winter time when my hair is dry. So put a tiny pea-size amount in your palms, and smooth onto hair. You can play with this to get rid of flyaways, add shine, or run your fingers through sections to define. If you have fine hair, take care to use less of this product.

5. My secret weapon for volume- Graham Webb Thick Infusion Weightless Body Spray. Spray it (a little goes a long way) around the roots/crown of your head till about half-way down. We are going for lift, volume, and thickness here ladies...just like the name says. This stuff delivers. Using hands, gently push up at ends of hair a couple of times so that you have lift from roots to tips. Think fluffy.

6. Then grab your teasing/lifting comb. I like the inexpensive Conair comb, and using the metal teeth I pick up and lift wherever volume is needed. Focus the action around the top of your head where we just sprayed in step #5.  Now if you are in the mood for Glamorous Soft Wave Carrie...gently brush out your waves. If you would rather do Chic Textured Wave Carrie (very me!) leave as is.

7. Finish it off with Sebastian Shaper Zero Gravity Hairspray. It's brushable and touchable, but still adds control...yay!!!!!!!! 

Hope you enjoy your waves for days! 

xoxo Becca