maven (noun) -someone who is dazzlingly skilled in any field; an expert or connoisseur; experienced.

fresh (adj) -original, vivid, cool, fashionable, sparkling, green; not previously known; new or different; not altered by processing.

Rebecca + Sesheta = MavenFresh

Showing posts with label DIY. Show all posts

Tuesday, May 1, 2012

PFMs Do it Better: DIY Studded Denim Vest

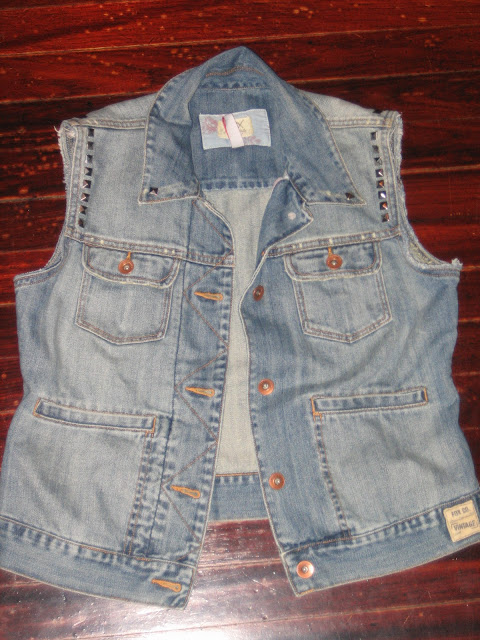
soo... i know the denim vest has been done... many, many, many times before.  you may even have seen a DIY on how to make a denim vest.  either way, i thought it would be fun to show, yet again, how this classic staple can be done at a really low cost to your pocket.  sure you could buy one already made, but where's the fun in that??  this is an easy project that only requires a little bit of time and a bit more creativity.


the first step is to gather your materials.  i hit my local thrift stores to find this denim jacket. i had to consider size, color and styling of the jacket.  i turned down a few because they just didn't fit or look right.  next,  i got some studs, i chose silver, which you can just about purchase in any craft store or order online.  then i got my trusty scissors.  it's really important to keep special scissors for cutting fabric.  it truly makes cutting straight as well as smoothly easier.


the next step is super easy - just cut off the sleeves.  if you have nice sharp scissors, this can be done in five minutes.  you can also choose how close to the seam you go for a more frayed look.  before i moved to the next step, i washed the vest as is - so that it would be fresh and clean for me to wear and also to help start the fraying at the edges.


now comes the final step- studding!! i totally forgot that i had one more tool; i also used my long needle nose pliers to assist me with making sure the studs closed nice and tight.  most people have these in your average tool kit.  (be sure they are clean so as not to mark your clothing.)  though this part can be tedious, especially depending on how much studding you plan on doing, it can be fun to design how to attach your studs.  i suggest thinking it out a bit first before committing.  it can be challenging to remove studs once securely attached - i learned that the hard way lol. 


...and done!!!  as you can see, i chose a simple studding pattern.  i like the subtlety of just a touch of studs.  besides, since we know these vests only get better with time, i can always add more studs later!  i can't wait to wear this with my summer maxi dresses and skirts or with my Docs and skinnies!! yay!!  :)

Monday, March 26, 2012

PFMs Do It Better: Spring Fever for the Exterior!

Do you have it yet...that feeling of Spring Fever? Well if you have it and it's making you want to tackle some outdoor home projects that have been put off for months, I'm saying it's now the prime season for house painting. Choosing paint color can be intimidating; it may take you weeks to decide on the look that you want for your exterior redo. So let's start planning now!

We purchased our house a little over a year ago. It was originally built in 1920 as a small raised bungalow. This is what the house looked like after priming it for the new paint job.
Primed and ready for fresh paint!
I thought if nothing else, I wanted to paint over the black trim and the dark red door, but after a few months of living there I wanted to do much more than just that. The stucco was painted white, once, a loooooong time ago, and visibly repaired in a few places. It was in desperate need of a fresh coat of paint as you can see. 
Painting prep: repair stucco cracks

*It helps if you have a focus, or at least one color that you love and must have. Personalize the look, make it your own. In my case, it was the door. I just knew we had to have a bright yellow door. Narrowing it down to the specific shade of yellow came later!

*Think about the neighborhood. One option is to coordinate with your neighbors a bit since they are part of your curb appeal. Also, think about location. If you're near water, maybe you are inspired to create a palette based on cool blues of the sea or the beige colors of the sand. Maybe you're in a wooded area with lots of green and landscaping...then you would want to pick contrasting colors so that your house doesn't blend in too much and get lost in your surroundings. Living in a beachside community with close proximity to our neighbors, we decided to embrace the sand with our main color and contrast with crisp white trim that screams beach! We saved the bright colors for accents like the door, furniture, and (coming soon) accessories. Doing this made our house look bigger (yay!) and not stick out among the other neutrals on the block.

 
*Consider any special characteristics that you want to highlight...like ornate trim, or the ceiling of your porch. We brought in the surf with a light blue porch ceiling color. It's so relaxing sitting under there. Maybe you want to play up the colors of your roof? After taking a good look in daylight I realized our slate roof tiles weren't just blue-grey; they have lots of rich beige-brown in them. This totally helped with the paint decision. The main sand-beige paint color I chose for the stucco really brings out the color variations in our roof tiles. We've been getting plenty of compliments from people walking by who say they didn't realize we had a slate roof until the house was re-painted!  

*When it came time to make color decisions we just painted samples directly on the house since it was white(ish). But painting samples on white foam core board will really help you decide where to put the color, and what colors to choose. Have fun with it!

 *Relax...there's lots of other details that you can update easily if you're not ready to tackle a paint job: replace your house numbers/mailbox/doorknocker/hardware. These minor changes will create an overall makeover without breaking your budget or costing you lots of time.
 

We used Sherwin Williams Duration Exterior Paint (HIGHLY RECOMMEND) which was colormatched to these Benjamin Moore colors: Body- Alexandria Beige HC-77, Door- Bright Yellow 2022-30, Ceiling- Jamestown Blue HC-148, Floor- Tamarind AF-120, Trim-Frostine AF-5.
 
I loved every second of the planning, shopping, and paint swatching. I'm all smiles each time I come home and see our bright yellow front door. Trust me, this type of a makeover will have you feeling unbelievably fresh and happy...after all, the exterior of your house is something that you look at every day. My next project for Spring will be the porch. On my to-do list: redo the landscaping below, add planters on the railing filled with fresh flowers, buy bright new pillows on the sofa to pull the paint colors together, paint a rug on the floor, and accent with some candles or mirrored mobiles.

What's going to be your Spring Fever project? Let us know if we can help you with anything.

PS- I have a fantastic painter you can contact...!

Sunday, March 11, 2012

PFMs Do It Better: DIY Wall Art/How to Hide Your TV Wires


I was very hesitant to have a wall-mounted TV, but it really is a space saver. The down side? Those pesky TV wires. We put the TV up about 10 months ago, and I've been staring at wires ever since. Not any more! My super-talented father-in-law loves a good DIY, and luckily he was ready to help my husband and I attack this one. I already had the fabric (purchased from IKEA), because originally I planned on making curtains or pillows with it.  Enter Fred with his frame-as-coverup idea. After much discussion and anticipation about we picked a DIY date and put this plan into action. Of course you will modify accordingly, but I think this would work so well for anyone trying hide wires. We conveniently have a recessed wall area over the fireplace, but if you don't and want a more finished look you could always "frame the frame" with strips of molding. 


Measure and layout before purchasing your materials. It might help to draw up a sketch. Materials we used: Five 2"x1"x8' wood strips/The DIY Kreg Jig/ pack of 1 1/4" pocket screws/Hand saw/Fabric for your panel/Cotton batting/Staple gun/Power drill/Saw horses/Tape measure/Clamp/Xacto Knife/ Scissors/4 L-Clips


Drill pocket holes in order to create a frame. Using the Kreg Jig we were able to make two pocket holes per joint and connect the two pieces of wood at a 90 degree angle. The Kreg website has a video that helps to explain this. It made this project much easier to complete, we had the correct angle every time!


Clamp the corner joint together before drilling the screws into the pocket holes.


 Check to make sure that the frame is the correct size.


We laid out the sub frame to fit around the TV mount.


Use a hand saw to cut the wood...but you can also use a chop saw.


I'm drilling the screws through the pocket holes to fasten the two joints. I love a good power drill, it takes me back to my days as a display coordinator at Anthro. This was easy peasy!


Frame is done! We placed it on our dining room table to have a work space. Lay out the fabric on top of the frame and adjust till it looks visually pleasing within the fame. Start stapling in one corner just to tack the fabric down a bit.


Flip over the fame with the fabric to continue pulling and stapling. We used a little extra padding in areas (cotton batting) to reduce the gap between the frame and the wall. Our existing wall was a little out of square. This pic also gives you a perfect shot of the completed sub-frame!


This is when having some extra assistance comes in handy (thanks Mom-in-law!) We had to pull and hold the fabric taught starting along one side while stapling the fabric consistently along the backside of the frame. Repeat along all sides while making sure to keep the fabric pulled tight.


Now the crucial part...were you wondering how to keep the fabric taught even with a large hole being cut out of the middle? Staple the fabric to the sub-frame prior to cutting the hole to ensure that the fabric will not loosen up. See the rectangular outline of staples in the pic!


 Using an exacto knife, cut an X from corner to corner of sub-frame, within the staple outline. Staple the flaps to the back of the frame and cut off any excess material. I was almost sad to cut the hole because the panel looked so pretty...hint, hint if you don't have TV wires to hide: without the hole this could simply be a pretty piece of wall art!


 My man putting the finished piece up...we used 4 L-clips to fasten the frame to the wall.


TA-DA!!! Wires are completely hidden, and we have beautiful wall art instead. This was a simple DIY, especially with the support of my father-in-law and his Kreg Jig (I love that thing.) The finished product is something that we can easily take down and put up again in a few years to replace the fabric if we want a fresh new look. Currently it's perfect for our color scheme of blue and grey with pops of yellow. We couldn't be happier with the outcome, it adds character to the living room. I think a few decorative objects on the mantel are long overdue! 

Wednesday, February 29, 2012

PFMs Do It Better: A Denim DIY (How To Hem Jeans)

I bit the bullet and tried what I never thought possible. hemmed my jeans while...(wait for it)...still keeping the original hem. And they were flare-legs with a 36" inseam! Let me walk you through how to do it.
First off before doing anything else- if they are new, wash and dry your jeans. This is key, we don't want any surprises due to shrinkage. Try on your jeans with the pair of shoes that you would be wearing. Fold the hem up to the appropriate length. Now you should have cuffs.
1. Carefully take off the jeans and measure how much you cuffed (from fold to bottom of the original hem.)


2. Divide that measurement in half. For instance: I folded my jeans up 2.5" in step 1. So, I divided that by 2 to get 1.25". 


3. Take that new measurement, refold the hem up accordingly and pin in place. We are not including the original hem in that measurement!   


4. Pay extra attention to lining up the seams at the sides while pinning. Especially crucial if you are hemming flares or wide-legs. Continue pinning until both legs are done. 


Using your sewing machine, stitch around the jean legs as close to the original hem as possible. Do not stitch on the original hem, and don't sew your pant legs shut by accident!
 Turn the folded edges inside of your jean legs. Break out the iron, and press the folds flat inside the jean legs. The steam setting was very helpful for this. I also pressed them from the outside to get them nicely crisp with a clean hemline. You will notice that if you had more than 2" of material to sew and press it will be bulky...remedy this by trimming the folded edge and zig zag the edges.


Try them on and get excited that you are finished, and that you can actually wear your jeans without tripping over them. No mad dash to the tailor necessary!


Tuesday, February 14, 2012

PFMs Do It Better: DIY Eugenia Kim Inspired Crochet Cuffed Pom Hat

You're either romantic or you're not...and I'm not so much. So instead of getting all hearts 'n flowers on you, I'm going to share a simple DIY that's completely unrelated to Valentine's Day. But the end result will keep you looking cute, cozy, and chic. I love Eugenia Kim's line of  headwear, the pieces are fabulous. Inspired by this ultra-expensive cuffed Rain Hat that I could not afford, it was time to come up with a crochet pattern alternative.

Materials: 2 Skeins Super Bulky Yarn in Black- I like to use Wool-Ease Thick & Quick or Loops & Threads Cozy Wool
N hook
Large Eye Blunt Needle
4” square of cardboard
16” long strand of yarn (not pictured)
Scissors!

Begin: Chain 24.
Row 1: Single Crochet in 2nd chain from hook and in each chain across. (23 sc)
Row 2: Chain 1, turn, and sc in back loops only all the way across.
Repeat Row 2 until piece measures approx 19” from the beginning.

Finishing Up: Now rotate the piece so that you can seam ends together; sl st in each st across to make hat. Fasten off and leave a long tail. Thread tail through ends of rows along edge and pull to gather for top of hat. Make a secure knot.

Pom-Pom: There are many ways to make a pom, but this is how we do. Using the 4” cardboard square, wrap the yarn around approx 60 times.  Carefully slide the yarn off the cardboard, and using your 16” piece of yarn, tie it around the center of the yarn bundle. Pull tight and knot securely. Cut the loopy edges to make them open up into pom-pom strands. Attach pom-pom to top of hat. Weave in ends.

Done, now you can wear this hat all winter! It looks pretty close to the original and you saved yourself over $100. Cuff it up and strut your stuff. Can't crochet? No worries, you can still get the look for less with the Greenwich Beanie Hat, now available in our etsy shop.

Tonight I will be enjoying the best brick-oven pizza on Long Island with my favorite guy at our new favorite spot. Intrigued? Maybe I will be tempted to share with y'all at some point, but for now we have to keep this little gem under wraps! Any special plans with loved ones for Valentine's Day? Do you like to celebrate it, or will you be curling up on the sofa and cranking out this DIY? 

Friday, January 20, 2012

PFMs Do It Better: Getting Carrie Bradshaw Waves


It's no secret to anyone that knows me...I love Carrie Bradshaw and her signature hairstyles. One of my faves that's so easy to recreate is her big messy waves (hair-did here and here.) Best part? Whether your hair is fine, thick, frizzy, or pin straight- you don't have to master a curling iron to own this style!   

1. After showering I prep with two pumps of Pantene Split End Repair in my palms, and work it into my damp hair starting at the ends. It works wonders. I stop halfway up...and there's no need to comb it through. 

2. Then I spray Bumble & Bumble Styling Lotion with abandon, concentrating at roots. Blow dry with a diffuser, while lightly scrunching. This styling spray gives you soft volume and adds to the textured-piecey-disheveled look that we are going for. Try to keep ends free of product for more movement.

3. Once hair is dry, the real action begins. I was a loyal curling iron fan until my hairstylist turned me on to the Hot Tools Deep Waver and now it's become an addiction. This is one purchase that you will never regret! My hair is thick so I like to adjust the heat setting under 400 degrees and section my hair half-up before making waves.  Just clip the top layer of your hair up in a loose bun and start underneath. We are going for deep beautiful waves...grab (approx) 2 inch section of hair and start several inches down from your roots with the first clamp. Repeat. Repeat again, if you're hair is at all on the longer side like me. Three clamps per section is my motto. Keep going till your entire head is full of waves! If you have bangs- play with what you like best. Most times I just blow dry them straight, but if I'm in between bang trims I've been known to clamp 'em!

4. I love CHI especially in the winter time when my hair is dry. So put a tiny pea-size amount in your palms, and smooth onto hair. You can play with this to get rid of flyaways, add shine, or run your fingers through sections to define. If you have fine hair, take care to use less of this product.

5. My secret weapon for volume- Graham Webb Thick Infusion Weightless Body Spray. Spray it (a little goes a long way) around the roots/crown of your head till about half-way down. We are going for lift, volume, and thickness here ladies...just like the name says. This stuff delivers. Using hands, gently push up at ends of hair a couple of times so that you have lift from roots to tips. Think fluffy.

6. Then grab your teasing/lifting comb. I like the inexpensive Conair comb, and using the metal teeth I pick up and lift wherever volume is needed. Focus the action around the top of your head where we just sprayed in step #5.  Now if you are in the mood for Glamorous Soft Wave Carrie...gently brush out your waves. If you would rather do Chic Textured Wave Carrie (very me!) leave as is.

7. Finish it off with Sebastian Shaper Zero Gravity Hairspray. It's brushable and touchable, but still adds control...yay!!!!!!!! 

Hope you enjoy your waves for days! 

xoxo Becca

Saturday, January 14, 2012

PFMs Do It Better: Introduction

Image Link: Design Vertigo

MavenFresh is starting the new year off with a new adventure! PFMs Do It Better will feature a whole bunch of inspirational tips, documented projects, and style intel. What does that mean for you? Let's just say that you can expect to find various DIY tutorials (including free MavenFresh crochet patterns), get advice on fashion-beauty-design trends and how to recreate them, sneak a peek into our homes...and at our must-have products that we can't live without.

Stay tuned for the premiere, coming soon...!!!